The main screen of the PIT is shown below. It is divided into three main sections:
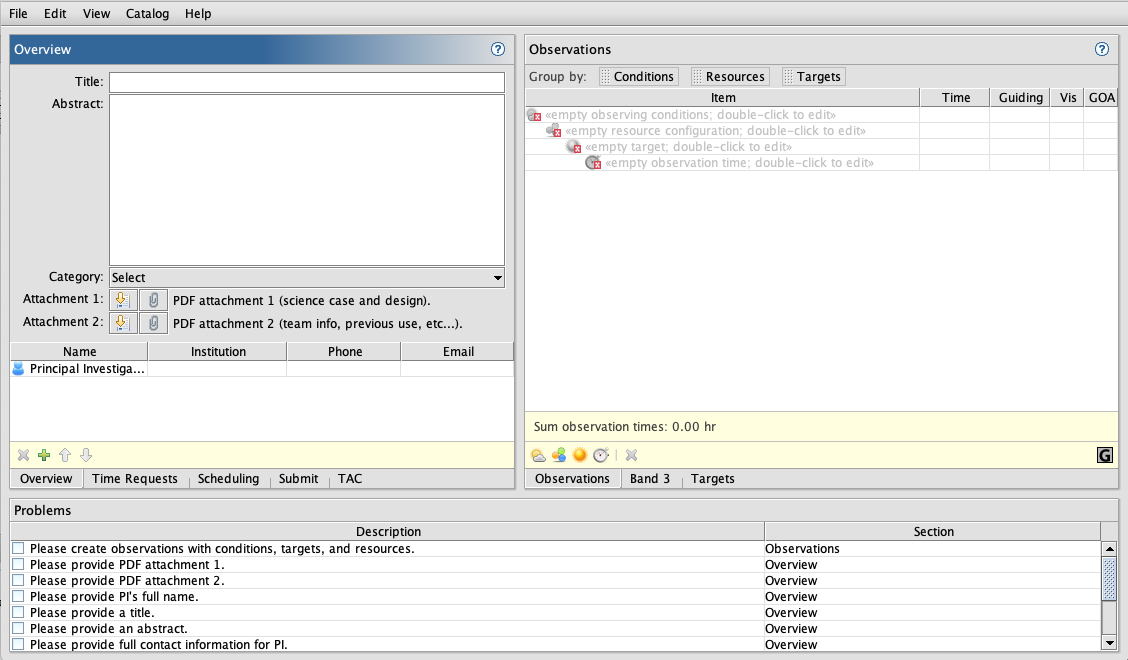
- At the top, there is a menu bar for file import and export and various preferences.
- The middle part is made up of two sections.
- The section on the left contains the tab views "Overview" (where is entered the TAC category and the PDF attachment), "Time Requests", "Scheduling", and "Submit".
- The section on the right contains the tab views "Observations", "Band 3", and "Targets".
- At the bottom is a "Problems" section (which can be seen as a "To Do list").
The main window can be resized by clicking and dragging the lower right corner. The individual section panes can also be resized by hovering the mouse cursor between the panes until the cursor becomes two oppositely-pointing arrows, and then dragging the pane in the direction of the arrows.
Menubar (File/Edit/View/Catalog)
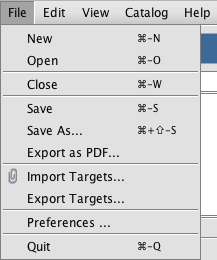
File: Proposal files are in XML format. The "File" drop down menu allows you to create a new proposal file, open an existing file, close the file, save the file, or export a summary as a PDF file. You can also import or export your targets from or to a csv, fits, tst or txt file. You can also quit the Tool from this menu. By opening multiple window via "New" option, you can display and work on as many proposals as you like. When opening an existing file, only files with the .xml extension will be shown. A file without the extension can still be opened by explicitly entering the filename.
The PDF summary contains information entered in the PIT GUI along with the PDF attachment(s) and is usually what the Time Allocation Committees use to evaluate the proposal. The following formatting options are available in the 2022B PIT.
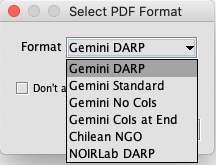
The Argentinian, Brazilian, and Canadian TACs uses the "Gemini DARP" option, the US/NOIRLab TAC uses the "NOIRLab DARP" option, the Chilean TAC uses "Chilean NGO", and the rest of the participants use "Gemini Standard". Large and long proposals use the "Gemini DARP" option and fast-turnaround proposals use "Gemini No CoIs" in an attempt to minimize unconscious bias in the evaluation process. Other proposal types such as director's time and poor weather use "Gemini Standard".
Edit: The usual features are available in this drop down menu: undo/redo, cut/copy/paste, delete and select all.
View: Choose between decimal degrees and HHMMSS.SS/DDMMSS.s for your target coordinates.
Catalog: Select the catalogs (SIMBAD, NED, HORIZONS) to be searched for coordinate and magnitude information on targets.
Help: This provides access to links to the Phase 1 Tool web page, the download directory for the LaTeX/Word text section templates (eg. 2016B), and the Integration Time Calculators. Selecting any of these will open the relevant page in the default web browser. If a page does not open, then try installing Firefox if that is not installed already.

Overview Section
This is the top left panel of the PIT, when "Overview" is selected from the "Overview / Time Requests/ Scheduling / Submit" options shown below the panel. A video tutorial is also available for this section.
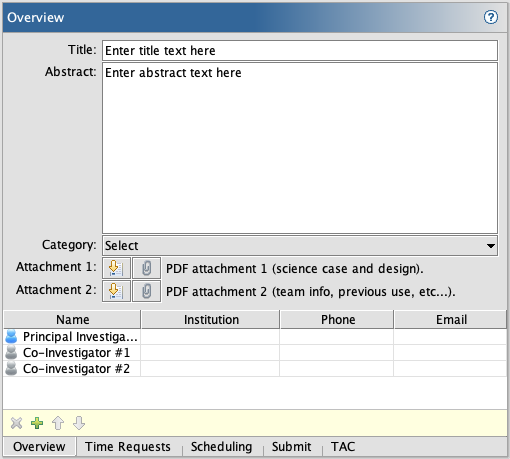
Title: Type the title of your proposal in the box.
Abstract: Type in your Abstract in the box. The Abstract should be limited to about 200 words. Use plain text, as LaTeX and other formatting commands will not be interpreted by the Tool.
Category: Please select the TAC category from the drop-down menu that most closely matches the theme of the proposal. The catagories from earlier versions are mapped to the new categories.
Attachment(s): Click on the Download button (down arrow) or select "Open LaTeX/Word text section templates in browser" from the Help menu to open the web site containing the LaTeX/Word templates for the text attachments in your web browser. Click the paper clip icon to attach a PDF file(s) containing your Science and Technical Case and team information. This files must be in PDF format and must be generated using the templates provided for the semester for which you are proposing. The attachments can be removed using the red "X" icon that appears on the right after you select a file.
Name, Institution Phone, Email: List the PI and co-Is in this section. Double click on the entry box to type in the information. You can use the "+" button at the bottom of the box to add another person on the list. The arrows can be used to move entries up or down. The gender selection option added in 2020A is optional and for internal statistics only, to help evaluate any gender bias in the proposal evaluation process. This information will not be shared with TAC members.
The PDF Attachment
The Science Justification, Experimental Design, Technical Description and other text is included as PDF attachments to the Phase I Tool. Tables and Figures can be included, subject to space limitations described below. Latex templates/style files, and Word documents are available for download and should be used. Select either the Latex template(s) and associated style (sty) file or the Word template(s) for the semester and proposal type from the lists below. Do not change the margins or font sizes, doing so may cause your proposal to be rejected. As reference, you can refer to some examples of template use.
Starting in 2022B most participants are using a dual-anonymous review process (DARP) for the semester proposal process. Check with your National Gemini Office for detailed instructions. Therefore, the proposal document is split into two sections. If submitting to a participant using DARP, then Attachment 1 must be written in an anonymized style. Attachment 2 is for sections that give information about the team and cannot be annonymized. If a joint proposal is submitted to a participant that uses DARP, then the proposal must be written in an anonymous style.
Poor-weather and Director's Time proposals must use the two attachments, but the proposals do not have to be anonymized.
Fast-turnaround proposals continue to require a single, anonymized attachment.
|
Current semester 2024A
|
||
|
Fast Turnaround |
Queue/Classical and PW/DD/SV/DS
|
Large and Long Programs |
|
Next semester 2024B
|
||
|
Fast Turnaround |
Queue/Classical and PW/DD/SV/DS
|
Large and Long Programs |
Be sure to save the Latex style files with the following names.
- 2024A: gem-observing-proposal_24A.sty
- 2024B: gem-observing-proposal_24B.sty
For Large and Long Programs (LLPS), the proposal narrative is limited to a total of 10 pages, and the science justification cannot exceed 5 pages, including figures and references. The page limit does not include ITC attachments.
Scientific Justification: For standard proposals this is limited to one page excluding references and up to two additional pages can be used for references, tables, figures (no more than three), and captions. For LLP proposals this is limited to five pages including figures and references. This should be a high-level description of the observations and the fundamental problem that they will address. Make sure to include the overall significance to astronomy. The Experimental Design section can be used to describe the overall observational program, including sample selection, data analysis, etc. The Technical Case can include details about the instruments, conditions, and exposure times required.
Experimental Design: For standard proposals this is limited to one page with no additional figures, this is a description of your overall observational program. How will these observations contribute toward the accomplishment of the goals outlined in the science justification? Include information such as why the specific targets were selected, the sample size, the analysis, etc. Describe any necessary calibrations in addition to the baseline calibrations.
Technical Description: For standard proposals this is limited to one page with no additional figures, this should be a description of how the observations contribute toward the accomplishment of the goals outlined in the science justification. Also justify the instrument configuration, the exposure times and the constraints requested. Describe the results from the Gemini Integration Time Calculator here. Justify the total and minimum time requested. If you are applying for instruments on both Gemini North and Gemini South, then provide the time request for each site.
Observing Mode (LLP proposals only): Describe the chosen mode of observation. The default mode of observation for LLPs is priority visiting observing, but queue and classical observing modes are also available. Requests for classical and fully queue mode must be accompanied by a justification for the request.
Management Plan (LLP proposals only): Describe the overall organizational plan for conducting the proposed LLP, including data reduction and analysis, preparation of survey deliverables, and staffing requirements. List the roles and responsibilities of the Co-Is with their anticipated time commitments directed to achieving the goals of the survey. You may also wish to detail external sources of support that will be used in the program. Please detail any use of non-Gemini observational facilities that are required to achieve the overall goals of the survey program.
Added Value (LLP proposals only): Describe, if any, added value to Gemini Observatory and the broader community from your proposed LLP. This added value can be through the public release of data products, data reductions routines, catalogs, software, hardware (eg. filters), public outreach, or other outcomes beyond the proposed science results. Include a timeline and the mechanism of their release to the community. Please differentiate between intermediate products developed during the execution of the survey versus the final products likely to be produced after the full observations have been obtained.
Band 3 Plan: If applying for queue time and it is acceptable for the proposal to be scheduled in Band 3, describe the changes to be made to allow it to be successful in Band 3 (limit text to half a page). If the total Band 3 time request is different from the standard request, then give the Band 3 time request for each partner and update the time requested from each site.
Classical Backup Program: If applying for classically scheduled time, describe the program you will pursue should the weather be worse than the requested observing conditions (limit text to half a page).
Justify Target Duplication: If your targets have been previously observed by Gemini using similar setups to those proposed here, the Observations section of the PIT will indicate this using a red stoplight icon. A list of the possible duplicates can be accessed by highlighting the observation, then clicking on the the icon to the lower right. Duplicate observations must be justified in this section.
Team Information: Provide any other information related to the roles, expertise, resources,and other team-specific information relevant to the proposal not covered in the other sections.
Publications: Enter a list of publications written by the PI and Co-Is that support this proposal.
Use of Other Facilities or Resources: List any applications to non-Gemini facilities that are related to this proposal.
Previous Use of Gemini: List allocations of telescope time on Gemini to the PI during the last 2 years, together with the current status of the data. You can locate the Gemini proposal ID and percentage completion using the appropriate link on the Schedules and Queue page. You can use your browser to search for the PI name or the proposal title.
Distribution of Targets (LLP proposals only): List the approximate distribution of hours per semester and per RA bin for the entire allocation request of the LLP proposal. If your request includes observations at multiple observing constraints (i.e. IQ70 and IQ85 observations), please indicate the number of hours in each bin at each condition state. The table does not count towards page limits.
ITC Examples: Use the Gemini Integration Time Calculator (ITC) for a typical source for each instrument requested. Save the ITC output as a PDF file and merge that to the PDF version of this document. More suggestions on how to do this are given in the PIT FAQ. These pages do not count towards the proposal page limits.
Time Requests
This is the top left panel of the PIT, when "Time Requests" is selected from the "Overview / Time Requests / Scheduling / Submit" options shown below the panel. A video tutorial is also available for this section.
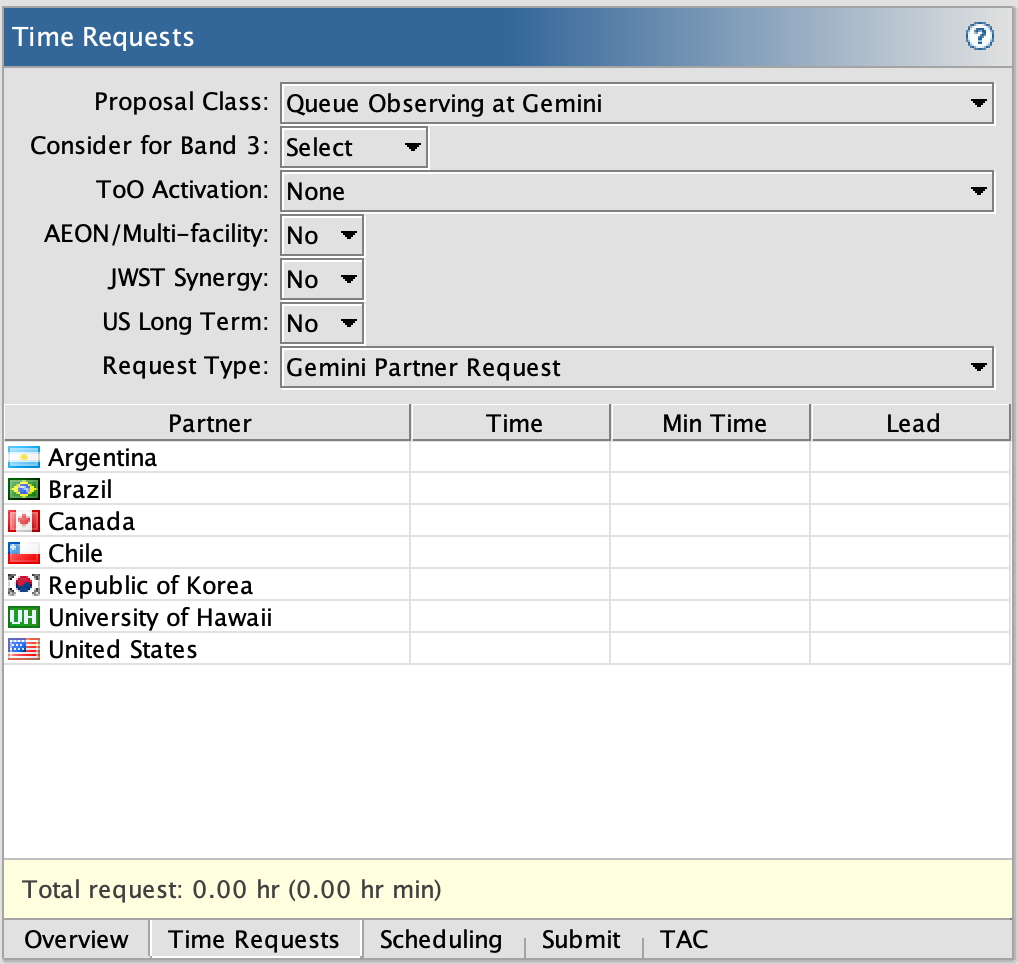
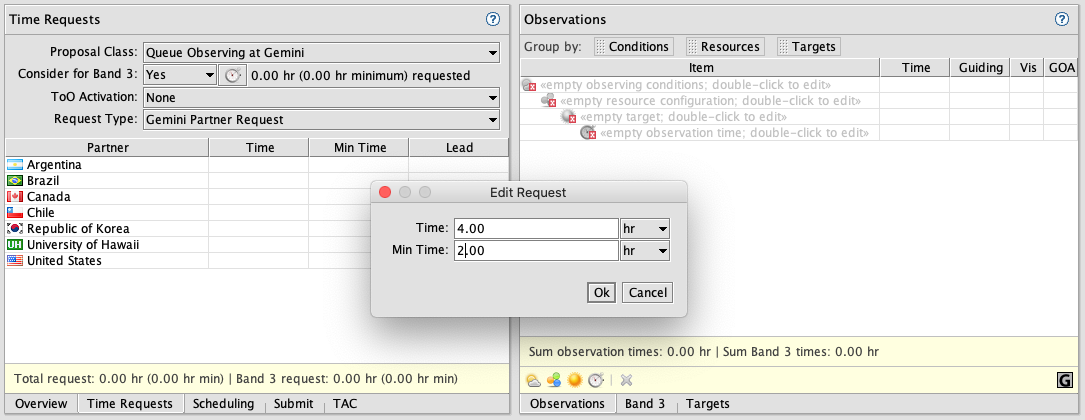
Proposal Class: Please select from one of the five options in the drop down menu. Indicate if your proposal is to be considered as a large program at Gemini, a queue program at Gemini, a classical program at Gemini, an exchange program at Subaru or Keck, or "Other" which includes Director's Time, Science Verification, Demo Science, and Poor Weather.
Large/long proposals: In the next line indicate if your program is a Target of Opportunity (ToO) program, and if it is then select whether the program will need to trigger Standard or Rapid ToO observations. Rapid ToO large/long programs may also trigger standard ToOs but make sure that this is justified in the Science Justification or Experimental Design. If you are requesting time from both Gemini North and South, then give the time request from each telescope in the Technical Justification section of the PDF attachment. The time request is then entered by clicking on the watch icon. Enter the total and minimum times requested for the entire program as well as the times requested for the first semester.
Queue proposals: If your program is a queue program, the next line will become "Consider for Band 3?". If your program is suitable for Band 3 then select "Yes" from the drop down menu, and click on the box to the right to enter both the full and minimum time allocation that is useful for you to get science in Band 3. If an allocation in Band 3 is acceptable, the Band 3 time request is different than the regular request, and it is a joint proposal, then be sure to state the time request from each partner in the "Band 3 Plan" section of the PDF attachment. If you are requesting time from both Gemini North and South, then give the time request from each telescope in the Technical Justification section of the PDF attachment.
Classical Proposals: If your program is a classical program, the next line will become "Visitors". Click on the box to indicate which of the investigators will visit the telescope for your run.
Other Proposals: If your proposal is a Director's Time, Science Verification, Demo Science, or Poor Weather program, select the appropriate type from the drop down menu below the Proposal Class entry. Then enter the time request by clicking on the watch icon.
Request Type: Indicate, using this drop down menu, whether you are asking for Gemini partner time, or whether the PI is a Keck or Subaru community astronomer.
Gemini partner request: Enter the amount of time requested from the appropriate partner(s). Double click on the partner to enter the information in a dialog like that shown below.
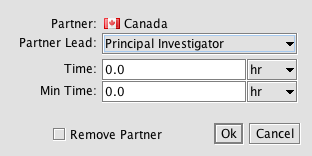
Give the total amount of time and the minimum acceptable time requested from this partner. This is the classical or Band 1/2 time request; the Band 3 time is entered via the box to the right of the "Consider for Band 3?" entry. Indicate the investigator that is the Lead investigator for each partner. If you have entered times for a partner and want to remove the partner request either enter 0s for both times or check the "Remove Partner" checkbox. Then click Ok.
The total and minimum times requested for classical or Band 1/2, and for Band 3, are summarized in the bottom line of the window. Proposal checks compare the requested times with the total times defined in the observations sections and compare regular and minimum times. Discrepancies are noted in the Problems section at the bottom of the main window.
Other options
Target of Opportunity (ToO): If the coordinates of the targets are not known at the time of the proposal deadline, then set the ToO Activation state. program, If the response to the resulting ToO "trigger" needs to be less than 24 hours, then choose Rapid, otherwise choose Standard. ToO proposals must include all instrument configurations which the team may want to use at Phase 1. This enables automatic creation of templates, and avoids errors at Phase 2.
AEON/multi-facility: Select ‘Yes’ to the AEON/multi-facility option if the proposal is one of a set of related proposals involving Gemini and other facilities, especially those offered by CSDC/NOIRLab. This is to emphasize the multi-facility nature of the program and have the proposals judged as a single entity as much as is practically possible. Describe and justify the roles of the other facilities in the Use of Other Facilities or Resources section of the proposal. Time on the other facilities must be requested by proposals to those facilities. For proposals with a non-Gemini CSDC/NOIRLab component, also select the "Multi Facility Companion" option in the CSDC/NOIRLab proposal system.
The Astronomical Event Observatory Network (AEON) was formed to promote rapid, flexible, programmatic access to world-class telescope facilities for efficient follow-up of astronomical transients, time-domain astronomy, and any project that requires multiple telescope facilities. The network is currently a collaboration between Las Cumbres Observatory (LCO) and NOIRLab’s Gemini and SOAR. An AEON compatible facility has 1) interfaces for submitting observations programmatically; 2) a queue observing mode; and 3) a data archive from which files can be downloaded programmatically. Information on using Gemini using AEON tools and capabilities are provided here.
If AEON/multi-facility is set to Yes, then the time for each site/instrument summed from the defined observations will be displayed along with the option of setting each as ‘Required’. While all requested facilities are important to a project, some may be essential, or required, for a multi-facility project to be viable. For example, imaging with NOIRLab’s DECam may be required to detect new targets for subsequent follow-up. Or, a Gemini spectroscopic capability may be the only resource that can meet a science goal. If one of the site/instrument combinations meets this criterion, then check the box in the ‘Required’ column. If in doubt, keep ‘Required’ unchecked.
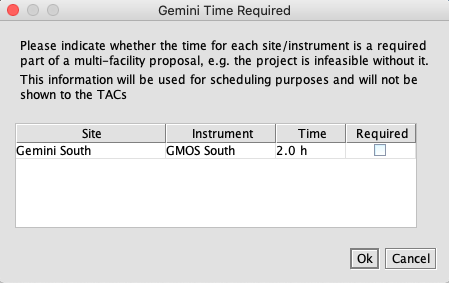
The ‘Required’ setting will not be shown to the TACs in order to not bias the evaluations. This information will be used to track the related Gemini and NOIRLab proposals after the TAC stage to evaluate whether all the ‘Required’ pieces were allocated time and scheduled. If any ‘Required’ resource is not scheduled, then all the components of the related proposals will be withdrawn.
JWST Synergy: Select 'Yes' if the proposal supports or is related to either approved JWST programs or JWST proposal preparation. Describe the combined science goals in the Science Justification and the combined observing program in the Experimental Design. More information is available here.
US Long Term: Select 'Yes' if the proposal is requesting or has received long-term status from the United States. This is different from the Gemini Large and Long proposal option.
Scheduling Section
This is the top left panel of the PIT, when "Scheduling" is selected from the "Overview / Time Requests / Scheduling / Submit".
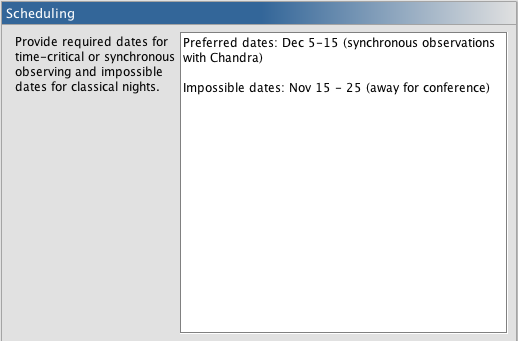
For queue-mode proposals you can specify optimal or synchronous (observations need to be coordinated with another telescope facility) dates. Optimal dates should be given only for programs that need observations on specific dates, say to catch a particular eclipse, occultation, or other rare phenomenon. Gemini will then attempt to have those nights be queue nights if the program is allocated time. Queue proposals should not give impossible dates.
For classical-mode proposals you can identify dates when the proposal should or should not be scheduled. If the proposal is allocated time then these dates will be used to schedule the classical run.
Some Gemini instruments are block scheduled, therefore any timing constraints MUST be included here for Gemini to schedule instrument exchanges appropriately.
Submit/TAC Sections
This is the top left panel of the PIT, when "Submit" is selected from the "Overview / Time Requests / Scheduling / Submit /TAC" options shown below the panel. A video tutorial is also available for this section.
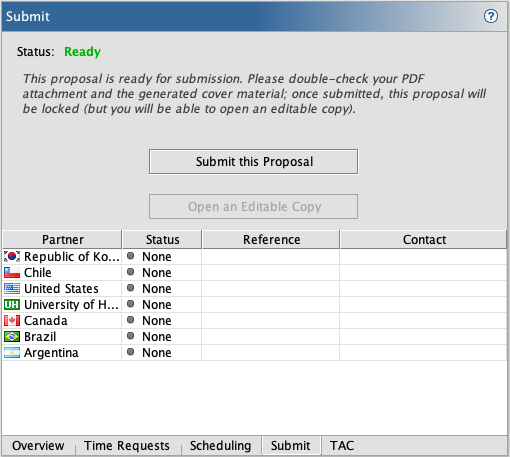
Confirm that the partner(s) listed accurately reflect your intentions. If there is an error, correct this using the Time Requests tab. If the status is not shown as "Ready", in green, then add the required information, or correct the error, as indicated in the Problems tab. If the proposal is ready and final, then click the "Submit this Proposal" button.
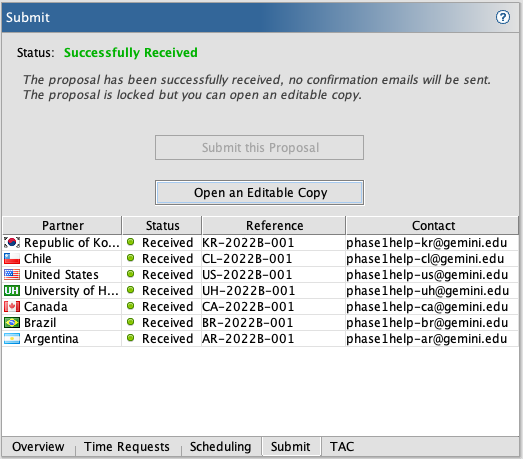
When the proposal is successfully received by each partner's server, the stoplight indicator will turn green. A "Received" in the submission status and the display of the reference number and contact information is your confirmation that the proposal was received. You will not receive a confirmation email.
Information about any errors will be displayed in a popup window and can be viewed if you hover the pointer over the error icon.
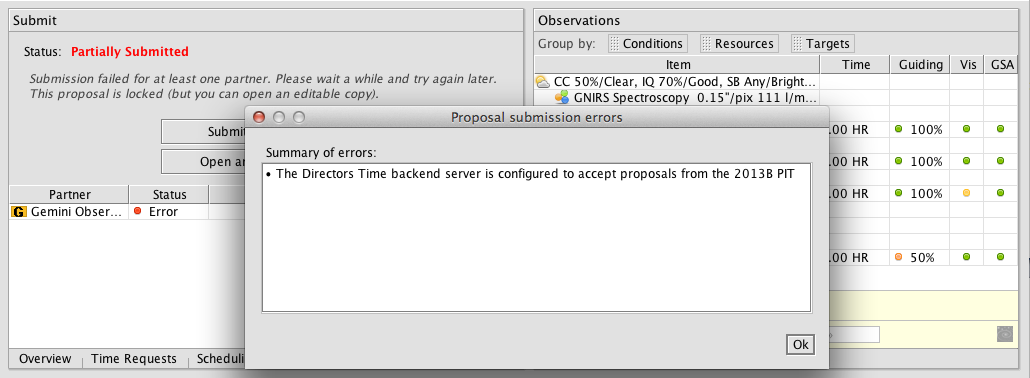
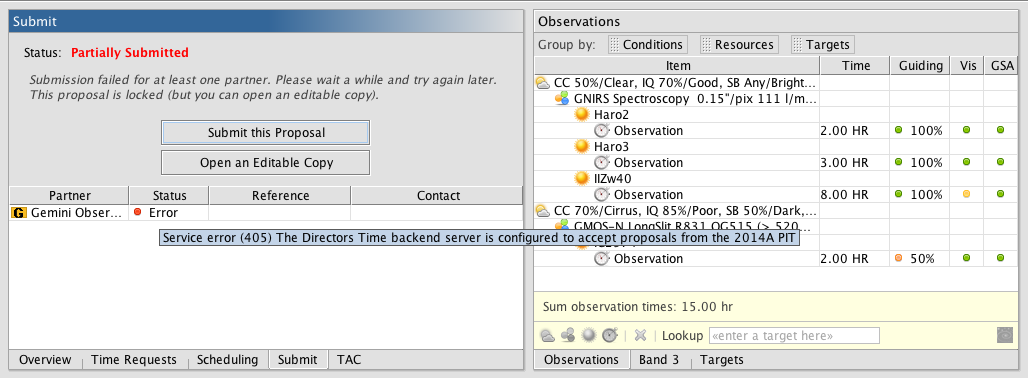
If you get the error that the backend is configured to accept proposals from a PIT for another semester, then please use that PIT for the submission.
If there are communication problems then the submission will time-out after one minute. Continue trying to submit until the submission to every partner associated with the proposal is successful (partners whose submission was successful will not receive multiple submissions). If there are other errors then please submit a Gemini HelpDesk ticket.
Once the proposal is submitted you cannot make any changes to the file. However, you can open an editable copy using the button below the submit button, which can be used for additional submissions in this or future semesters. Unless specified otherwise the last of any multiple submissions will be forwarded to the TACs.
If you have any questions or problems either send an email to any of the contacts listed or submit a Gemini HelpDesk request.
The TAC tab is for national and international time allocation committee use only.
Observations Section
This is the top right panel of the PIT, when "Observations" is selected from the "Observations / Band 3 / Targets" options shown below the panel. A video tutorial is also available for this section.
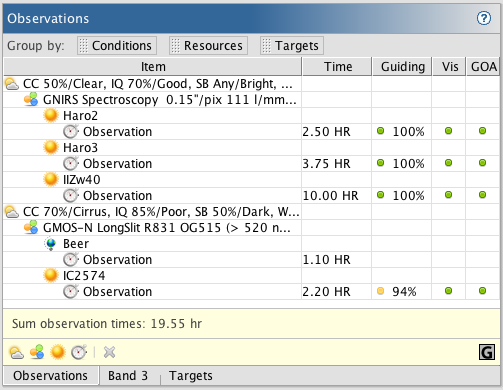
Observations Tab Overview
Add an observation: To add an observation click on one of the four icons at the bottom left of this panel. Each icon represents, from left to right, weather constraints (or conditions, cloud icon), instrument configuration (or resource, filter wheel icon), target information (sun icon), and observation time (clock icon). Clicking any one of the buttons will create an entire observation tree if it does not yet exist. For instance, if you click on "Target" icon and enter a target, then the other items (Configuration, Conditions, Observation) will also show up. Double-click on each node to enter the required information.
Group by: To re-organize your observations, drag the Conditions, Resources, Targets labels at the top of the panel to the left or right. The options can be put in any order, but the default ordering of Conditions:Resources:Resourdes is recommended.
Conditions (cloud icon): Select the observing conditions necessary for your science: cloud cover, image quality, sky brightness, and water vapor.
Resource (filter wheel icon): You can select the instrument, observing mode, grating, slits, filters, etc. here. The wizard will lead you through a "decision" tree of modes and their options. Targets of Opportunity (ToO) proposals must include all instrument configurations which the team may want to use at Phase 1. This enables automatic creation of templates, and avoids errors at Phase 2.
Target (sun icon): This will bring up a new Edit Target window where you can enter a new target manually or query SIMBAD, NED, or Horizons. Target information entered here will automatically show up under the Targets tab.
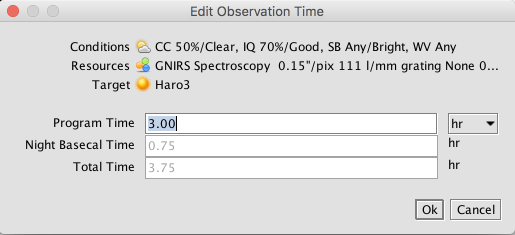
Observation Time (clock icon): Specify the length of time to be spent on observing the target in the box labeled "Program Time". Overheads should be included as described on the instrument pages, including time for acquisitions, detector readout, offsetting, etc., and any calibrations that are not part of the baseline calibration set. Starting in 2017B the time required for baseline calibrations are shown in the "Night Basecal Time" box and is added to the "Total Time" that needs to be requested (see below). The calculation details are given here. The baseline calibrations are described on the instrument pages but mostly include standard/telluric stars, required flats and darks, GMOS calibrations, near-infrared calibrations, and mid-infrared calibrations. Following Gemini Board resolution 2016B.A.2 the time needed for baseline calibrations will be included in the program allocation but this time is charged to the partner, not to the program. The Night Basecal Time is based on global averages so program-specific adjustment should be avoided and so that the total program time will be correct in the Observing Tool if the program is allocated time.
Delete (red cross): This will delete the selected node.
If you have multiple targets you can also read in a target list in one of the acceptable formats by selecting "Import targets..." from the File menu.
You may also copy/paste targets from the Targets tab. An efficient way to make observations of lots of targets that have similar conditions and resource needs is to add the conditions, and resoruces, load a list of targets using the Target tab, or "Import targets...", then copy/paste the targets onto the Resources node. The observation times then can be entered manually or duplicated with copy/paste.
Guiding: This column will show a red/yellow/green (bad/marginal/good) stoplight icon, and percentage for the likelihood of finding a suitable UCAC4 guide star or guide star asterism (GeMS/GSAOI) given the weather conditions and the specified instrument configuration. Details of the parameters used are given here. Only guide stars for the default wavefront sensor for the instrument/mode are evaluated. The geometries of all the wavefront sensors are included in the algorithms. For wavefront sensors with symmetrical fields (e.g. PWFS1 and PWFS2), the percentage indicates whether a guide star is available or not. For instruments with asymmetrical wavefront sensor fields-of-view (e.g. GMOS, FLAMINGOS-2, GeMS/GSAOI), the algorithm checks for guide stars over a complete range of position angles (PAs). The percentage shown is the percentage of positions tested that have suitable guide stars. If the success probability is less than 50% and a specific PA is required then the Observing Tool (OT) can be used to check whether a guide star is available at that PA. If the indicator is red, then please change the weather conditions or the target, so that guiding is feasible. In some cases, a small change in position may also bring a guide star into the wavefront sensor field. This can be checked with the OT. If the likelihood is low but a guide star is available then please add a brief note in the technical justification.
Vis: This column will show a red/yellow/green (bad/marginal/good) stoplight icon indicating the visibility of the target in the given semester. This is the result of a comparison between the coordinates of the target and the RA/Dec limits for the semester and observing mode. If red, please consider proposing the target for a different semester or a different site (Gemini North vs. Gemini South).
GOA: This column will show a red/yellow/green (yes/some/no) stoplight icon indicating any duplication of data in the Gemini Observatory Archive. If duplication is indicated, highlight the observation, then click on the Gemini "G" icon at the lower right of the panel to view a list of the data found in the Archive in your web browser.

Manipulating Observations
Once an observation is created there are a variety of ways of editing and manipulating the nodes.
Undo/Redo: Undo/redo options are available for all changes and actions to the observation nodes. If something unexpected happens or you make a mistake, just undo!
Highlighting nodes: Click on a node to highlight it. Command/Alt-click on a node to deselect it. Whether or not a node is selected determines the behavior of other features. If a node is selected and you click one of the "add node" buttons from the bottom of the panel, the placement of the new node depends on the current organizational hierarchy. If the node to be added is lower in the current display hierarchy, then the new node is added below the selected node. If the node to be added is at the same level or higher in the hierarchy, then a new observation "tree" is created. For example, with the default Conditions/Resources/Targets hierarchy, selecting a resource/configuration node and then adding a new target will put the target under that resource node. If no nodes are selected, then adding a node will create a new observation "tree".
Drag/Drop: A node and all sub-nodes can be drag/dropped into another place in the hierarchy. The node must be dropped into a node that is higher in the current hierarchy. While dragging, the locations where you may drop your selection are highlighted in grey as you mouse over them.
Copy/Paste: A node, and all sub-nodes, may be also be copy/pasted. This is done with key commends Cntl/Commend-c and Cntl/Command-v or by selecting options from the Edit menu. Copy/Paste works similarly to drag/drop, and nodes may only be pasted where they can be dropped. However, copy/paste also works between the Targets, Observations, and Band 3 tabs. For example, you can copy an entire observation in the Observations tab, switch to the Band 3 tab (if Consider for Band 3 is Yes), paste the observation, and then edit the observing conditions. You may also select multiple targets from the Targets tab and paste all of them into the appropriate place in the Observations or Band 3 tabs.
Night Baseline Calibration Overheads in PIT
Starting in 2017B the PIT calculates the time needed for nighttime partner baseline calibrations and adds this time to the total time request. For optical instruments and NIR imagig the time for baseline calibrations is calculated as a fraction of the program time according to the table below. For example, for a GMOS-N spectroscopic observation that requires 3 hours of program time (exposure time, acquisition and readout overheads), the total time is 3 + 3*0.1 = 3.3 hours. For NIR spectroscopy 0.25 hours of partner calibration is added for every 1.5 hours of requested time. For example, a GNIRS observation with 4 hours of program time will have a total time of 4 + 0.25 * ceil(4 / 1.5) = 4.75 hours. This is an approximation of the baseline calibration rules for telluric standards and is more realistic than previous estimates.
The Partner Overhead in the table are based on time accounting from recent semesters, e.g. see the baseline calibration overheads.
| Instrument | Mode | Partner Overhead |
| 'Alopeke | Imaging | 0.00 |
| FLAMINGOS-2 | Imaging | 0.10 |
| FLAMINGOS-2 | Longslit | 0.25 hr for every 1.5 hrs |
| FLAMINGOS-2 | MOS | 0.25 hr for every 1.5 hrs |
| GHOST | Spectroscopy | 0.00 |
| GMOS | Imaging | 0.00 |
| GMOS | Spectroscopy | 0.10 |
| GNIRS | Imaging | 0.10 |
| GNIRS | Spectroscopy | 0.25 hr for every 1.5 hrs |
| GPI | Spectroscopy | 0.05 |
| GRACES | Spectroscopy | 0.00 |
| GSAOI | Imaging | 0.00 |
| IGRINS | Spectroscopy | 0.25 hr for every 1.5 hrs |
| NIFS | Spectroscopy | 0.25 hr for every 1.5 hrs |
| NIRI | Imaging | 0.10 |
| DSSI | Imaging | 0.00 |
| Phoenix | Spectroscopy | 0.25 hr for every 1.5 hrs |
| MAROON-X | Spectroscopy | 0.00 |
| Texes | Spectroscopy | 0.00 |
| Zorro | Imaging | 0.00 |
| Visitor | Any | 0.00 |
| Any Subaru | Any | 0.00 |
| Any Keck | Any | 0.00 |
Band 3 Observations
This is the top right panel of the PIT, when "Band 3" is selected from the "Observations / Band 3 / Targets" options shown below the panel. The Proposal Class must be set to Queue, and Consider for Band 3 should be set to Yes, in the Scheduling Section. A video tutorial is also available for this section.
Band 3 Observations: Unless your program absolutely needs the very best observing conditions that Mauna Kea or Cerro Pachon has to offer, relaxing your cloud cover, image quality, sky brightness, water vapor or elevation or airmass requirements can greatly increase the chances of the program's getting data; see the Advice for Band 3 web page. All proposals that wish to be considered for Band 3 must fill out this section. Programs are placed in Band 3 only if they cannot be allocated time in Bands 1 or 2.
Enter the observations that can be done in Band 3 in this panel. If you already have target/observations defined in the "Observations" section, you can copy/paste (using the "Edit" menu) the observations from there to the "Band 3" section. Then update the observing conditions and time per target as needed. If the program is allocated time in Band 3, then only the observations defined in this tab will appear in the Phase 2.
More information on creating and grouping observations is available on the Observations section.
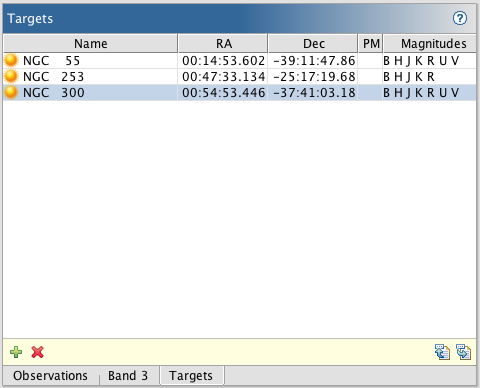
Targets Section
This is the top right panel of the PIT, when "Targets" is selected from the "Observations / Band 3 / Targets" options shown below the panel. The target list may be sorted by clicking on any of the column names in the table. Note that for large/long program proposals only the targets for the first semester have to be entered into the PIT when the proposal is initially submitted.
Entering targets individually:
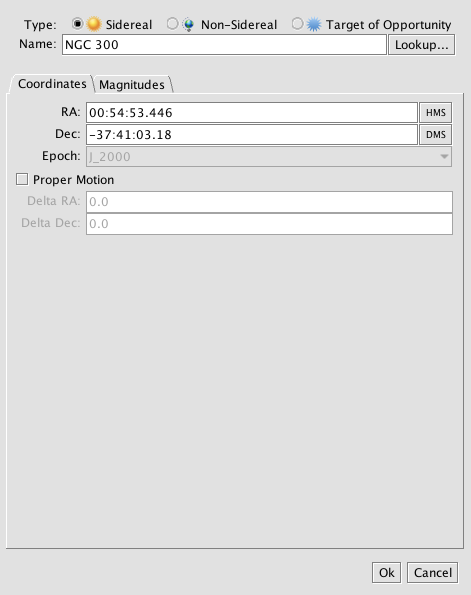
Pressing the "+" button at the bottom of the window will bring up the Edit Target window (see below). You can either enter its name and click "Lookup..." and have the software lookup the coordinates and brightness via the seleted catalogs, or you can enter the coordinates, proper motions (if significant), and brightness manually. The catalog selections for the automatic lookup can be changed by clicking the "Catalogs..." button from the menu bar.
 |
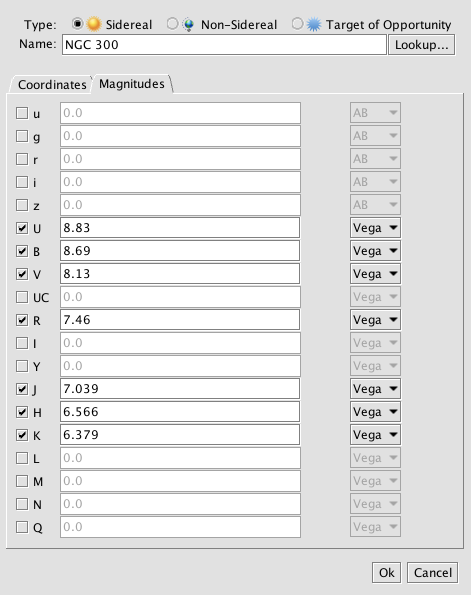 |
Target brightnesses for sidereal targets are entered by selecting the "Magnitudes" tab (above right). Select the bandpass and then enter the brightness and the system. The default system is Vega magnitudes, the other options are AB magnitudes and Janskys.
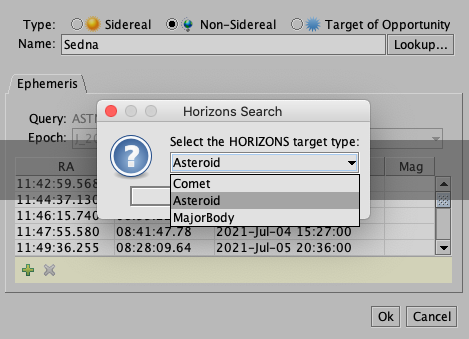
Coordinates for non-sidereal targets are entered in an ephemeris. Selecting "Non-Sidereal" from the Type options reveals an ephemeris table with columns for RA, Dec, UTC, and magnitude. Entering a target name and either pressing the 'Return' key or the 'Lookup' button will initiate an ephemeris query from the NASA/JPL Horizons service. First, you must select the Horizons target type (Comet, Asteroid, or Major Body) as in the Observing Tool (below, left). You may need to disambigulate multiple matches. If the object is found in the database then the ephemeris is downloaded and placed in the table. The specific Horizons desgination is also shown (below, right) .
 |
 |
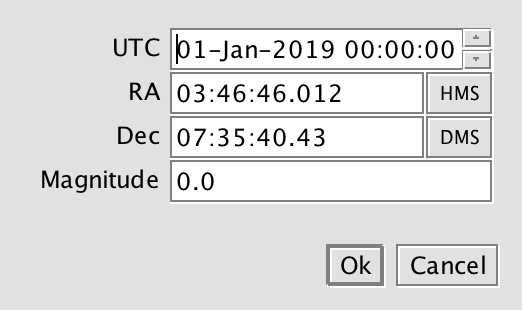
Add a new ephemeris entry by clicking on the green "+". Delete an entry by selecting it and then clicking on the red "X". Double click on a line in the table to edit the UT date, RA, Dec, and magnitude (below). For manual entry we recommend using 0hr UT on the date entered. A non-sidereal target input file (see below) can be used to enter arbitrary UTC times
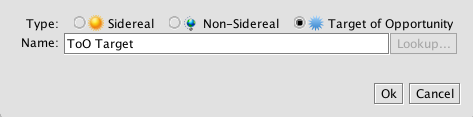
For target of opportunity (ToO) proposals, enter dummy targets by selecting "Target of Opportunity" from the Type menu. These targets do not have coordinates or brightnesses.
Importing a target list:
Click the "Import targets..." button in the lower-right corner of the Target panel or select "Import targets" from the File menu. Select the file to load. The software will check to make sure the file is one of the acceptable formats and will warn you if it is not. Acceptable formats are CSV (comma-separated), FITS table, VO table, and tst (tab-separated).
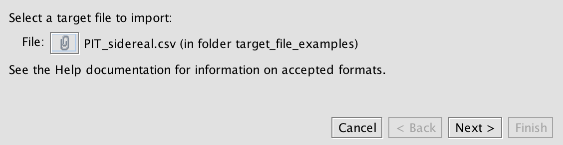
Click "Next" to review the list of targets found in the file,
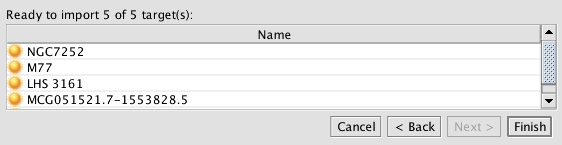
and then "Finish" to load the objects into the target list.
For sidereal targets the required columns are: Name, RAJ2000, and DecJ2000. Optional columns include proper motion (pmRA, pmDec), and the brightness with photometric system (for example V, V_sys and K, K_sys).
For non-sidereal targets the required columns are: ID, Name, UTC, RAJ2000, and DecJ2000. The target brightness is optional. A single non-sidereal target in a Horizons ephemeris file can also be entered.
See the examples of sidereal and non-sidereal target import files for more more options.
Saving a target list:
Click the "Export targets..." button in the lower-right corner of this pane or select "Export targets" from the File menu. A popup of export preferences then appears. If the target list includes a mixture of sidereal and non-sidereal targets, then select which kind to export. Also, select the export format (csv, FITS table, tst, VO table) and click OK. Then select the directory, enter a file name and click Save.
Copying targets:
Once the target table is populated you can select one or more targets from the table, do Ctrl/Command-c (or the Edit menu) to copy, go to the Observation or Band 3 tab, highlight the instrument configuration that you want to use, and then paste the targets with Ctrl/Command-v.
Problems Section
This is the lower panel of the PIT.

This section will list outstanding items still to be entered (abstract, observation, etc.). Errors will also be shown here. Double clicking on the entry will take you to the relevant section.